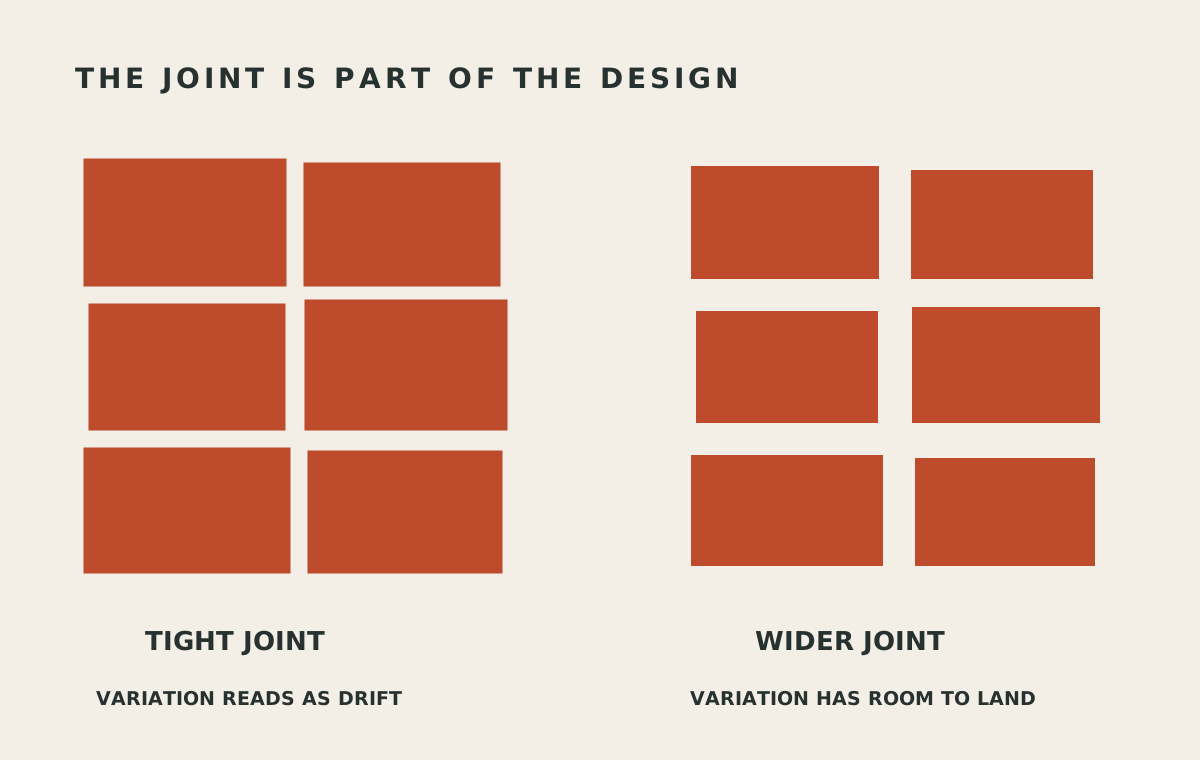
Handmade tile is not dimensionally consistent, and every installation decision follows from that one fact. Expect up to 1/8 inch and sometimes 1/4 inch of variation in length, width, and thickness inside a single batch. That variation is why handmade tile needs a wider grout joint, why the layout is set by eye rather than by spacer, and why the pattern has to be approved before anything is stuck to the wall.
Start with the number: 1/8 inch, sometimes 1/4
Machine-made tile arrives calibrated. Every piece in the carton is the same piece.
Handmade tile does not work that way, and Martin Brookes, Fox Marble's Director of Installation and a veteran of more than 40 years in the tile industry, treats the variation as normal rather than as a defect:
It is completely normal to see up to 1/8 inch or even 1/4 inch of variation in length, width, and thickness within a single batch.
Three dimensions, not one. Length and width affect the grid. Thickness affects how the tile sits against the wall, which is a separate problem taken up further down.
Every recommendation that follows exists to absorb that number.
Why the joint has to be wider
The instinct with expensive tile is to run the joint as tight as possible, on the theory that a thinner grout line shows off more tile. With handmade tile that instinct produces the opposite of what it's reaching for.
Martin's minimum is 1/8 inch to 3/16 inch, and sometimes up to 1/4 inch. That tracks with what handmade tile manufacturers publish for their own product: Fireclay, for instance, recommends 3/16 inch for its ceramic tile and calls 1/8 inch the tightest it will ever advise.
You cannot run them tight, like a 1/16 inch joint, because the edges are irregular and the sizes vary from tile to tile. A wider joint absorbs these inconsistencies so the overall grid still looks straight to the human eye.
The phrase to hold onto is absorbs these inconsistencies. The joint is doing work. It is not empty space between tiles, it is the tolerance that lets a wall of irregular objects read as a straight grid. Squeeze the joint to 1/16 inch and there is nowhere for a 1/8 inch size difference to go. It has to appear somewhere, so it appears in the lines. The grid starts drifting, and the eye catches a drifting line long before it catches a wider joint.
Wide joints on handmade tile are not a compromise on the look. They are what makes the look possible.
The layout is set by eye
The same variation rules out the standard method of keeping tile aligned.
You have to layout by eye and use wedges rather than relying on fixed hard-plastic spacers, and you have to be ready to fudge the lines.
Fixed plastic spacers enforce an identical gap everywhere. That is exactly right for calibrated tile and exactly wrong here, because an identical gap between tiles of differing sizes guarantees the courses go out of alignment. Wedges allow the joint to open or close slightly, tile by tile, so the installer can hold the line even as the pieces change size underneath it.
"Fudge the lines" is the honest description of skilled work. The installer is continuously making small corrections to keep an irregular material reading as regular, and it cannot be delegated to a spacer.
This is also the clearest reason handmade tile is not a place to price-shop the installation. The tolerance lives in the installer's judgment. Blending is mandatory, and it happens before setting
Handmade tile varies in color and glaze the same way it varies in size, and the fix has to happen before the first tile goes up.
Blending is mandatory. On-site, this looks like opening 4 to 5 cartons at once and pulling tiles randomly from each box to stack in the installer's working pile.
The purpose is distribution. Slight color variation and glaze pooling get spread evenly across the wall instead of concentrating, which is what prevents the failure Martin names: noticeable blocks of light or dark tile.
Consider what happens without it. Cartons get worked one at a time, in order. If carton three ran slightly darker at the kiln, that difference does not scatter across the wall, it lands as a band roughly the height of one carton's worth of coverage. Nothing is wrong with any individual tile. The wall has stripes.
For a designer, this is worth asking about directly. "Do you blend across cartons before you set?" is a short question with a revealing answer.
Every tile gets back-buttered
The thickness variation, the third dimension in Martin's number, is handled at the setting bed, and it changes the labor on the job. "The uneven backs absolutely change the approach. You cannot just trowel the wall and press the tile in. Every single handmade tile must be back-buttered, having thinset applied smoothly to the back of the tile, before being pressed into the combed thinset on the wall."
The target is 95 percent or greater coverage, compensating for the concavity of the tile back. That figure is the ANSI A108.5 requirement for wet areas and exteriors; in a dry area like a kitchen backsplash the standard is 80 percent. Worth being precise about what back-buttering is and isn't: it is not itself an ANSI requirement, and it does not by itself establish coverage. It is what this particular material needs in order to reach the number.
Handmade tile backs are not flat. Press a concave back into combed thinset and it makes contact at the edges while leaving a void in the middle, which is a hollow spot, a weak point, and on a shower floor a place for water to sit. Back-buttering fills the concavity before the tile ever reaches the wall.
Read the labor implication, because it explains a bid. Every single tile is handled twice. That is not an upsell, it is what the material requires, and an installer who is not doing it will quote lower and produce voids.
The zellige job that had to come out twice
The most instructive failure Martin has described publicly was not caused by a mistake in the installation. It was caused by a picture in somebody's head. A large residential contract specified zellige in two bathrooms. Martin knew the material's limits going in, so mockups were built and the designer approved them. The tile went up and was grouted
Then the owner objected. He had seen a one-foot sample board in a showroom, set with no grout joints at all, and that tight, seamless look was what he had been expecting the whole time. It was not what the designer had approved and not what anyone had agreed to. The GC ended up mediating. The owner did not move, and the installation came out and was redone, with the GC covering the cost.
Read where the failure actually sat. The tile was correct. The mockup was correct. The designer signed off. And none of that mattered, because the person with the final say had formed his expectation from a sample board that did not represent how the finished wall would look, and nobody had closed that gap before the tile went up.
The second attempt closed it. Martin's team built story poles, laid out every elevation on the floor, photographed each one, and circulated the photographs to every party for approval before setting a single tile. He has said openly that setting the tile that tightly went against his judgment, because butting high-absorbency tile edge to edge risks the glaze separating from the bisque underneath.
That job is why the industry now has a document about this. Martin convened a working group of tile experts to write installation guidance specifically for zellige, and it was approved for the 2024-2025 NTCA Reference Manual.
The lesson generalizes past zellige. With handmade tile, approval from the designer is not the same as approval from the person who will live with it, and a sample board is not the same product as a wall.
What the NTCA guidance recommends
The document Martin's group produced covers ground worth knowing before a handmade tile order is placed. Paraphrasing its key recommendations:
- Build a grouted mockup, not just a dry lay, and get every party to approve it. An ungrouted layout cannot show what the joints will look like, and the varying joint widths are a large part of the finished character. That is exactly the gap the two-bathroom job fell into.
- Order about 25 percent extra. That covers cutting and breakage, and it leaves enough on hand to set aside tiles with characteristics you do not want on the wall. It is higher than the 15 to 20 percent overage most tile suppliers quote as standard, and deliberately so. Handmade tile gets sorted during installation, and the rejected pieces come out of the same order.
- Use an adhesive with extended open time, flexibility, and strong bond strength, to resist movement and cracking.
- Ask the supplier whether the tile should be soaked first. High-absorbency tile can pull moisture out of the adhesive too quickly.
- Talk to the grout manufacturer about staining and about adhesion with sanded grout, and include the chosen grout type and color in the mockup.
- Learn to tell character from defect. Hairline crazing and variation in color and glaze are what the material is. Structural problems are not. Sort that out before installation rather than during it.
- Wear gloves. The edges are sharper than they look, especially on mitered corners.
- Request an installation data sheet from your supplier for that specific tile.
One more point, made by Moroccan zellige supplier Georgia Ezra of Tiles of Ezra alongside the document's publication rather than in the document itself: "zellige" is increasingly used as shorthand for any tile that looks handmade, including machine-produced imitations. Genuine zellige is handcrafted in Morocco, and quality varies enormously between workshops, down to how the artisans making it are paid and treated. Where the tile came from is worth asking about.
The dry lay is where the answer arrives
Fox does not resolve layout questions on the wall. It resolves them on the floor, in front of the client. The crews work across the Bay Area out of the company's Richmond shop, and the dry lay happens on site rather than in a showroom.
We always do a dry lay, and we always want a sign-off from the client, homeowner, architect, or builder prior to installing tile.
The dry lay confirms the pattern fits what everyone has been looking at on the print or elevation, and that the texture, colors, and orientation match what the client pictured. The sign-off is always written, either an email confirmation with a photo of the dry lay attached or a signed approval form on site.
For handmade tile this is not a formality. An elevation drawing is a flat, uniform representation of a material that is neither. It cannot show what the surface variation looks like across a whole wall, at the scale it will be viewed, in the room's actual light. And on handmade tile the NTCA guidance goes a step further than a dry lay: build a grouted mockup and get it approved. The reasoning follows directly from the joint discussion above. A dry lay shows the tile. Only a grouted mockup shows the joints, and on handmade tile the joints are half of what the finished wall looks like.
The other thing worth getting right is who signs. The two-bathroom job had designer approval and still came out, because the owner had a different picture and had never been shown one that matched.
Fox also stays out of the design seat when there is a designer of record: "We tend not to be designers when a professional designer is in place. We would let them make the call." The dry lay is not the installer taking over the design. It is the installer moving the design decision to the last point where it is still reversible.
Where the joints go, and what goes in them
One more joint rule, and it overrides the joint width discussion above.
Grout should never be put in a corner and changing plane.
Corners and plane changes move, grout is rigid and doesn't, and Martin reads the result strictly: "Even a cracked grout joint is a failure because it should not crack. That should be a soft joint." A soft joint is a flexible line of silicone sealant used wherever walls meet or floors meet walls, allowing the building to shift and expand without cracking the tile or grout. EJ171 permits 100 percent silicone, urethane, or polysulfide in those joints; on finished residential work Fox uses color-matched 100 percent silicone at every inside corner.
And a myth worth closing before it becomes anyone's plan. Sealer does not solve a joint problem. "People think putting sealer on grout will help mitigate and stop water intrusion. It will not. It's there really as a protectant for stains, and doesn't add any value as a waterproof membrane."
A sealed cracked joint is still a cracked joint, and the sealer has done nothing about the movement that cracked it.
The stakes
Handmade tile is bought for irregularity. Nobody pays a premium for zellige because they want it to look manufactured.
The paradox of installing it is that all of that irregularity has to be actively managed, tile by tile, to read as intentional rather than as sloppy. Wider joints to absorb the sizes. Wedges instead of spacers to hold the line. Blending across cartons so the color scatters. Backbuttering so the backs sit flat. A pattern chosen for how much variation it can hide.
Skip any one of those and the tile does not look handmade. It looks badly installed. The material takes the blame for the method, and the client who spent the money on character ends up looking at a wall that reads as a mistake.
Which is why the decisions get made while the tile is still loose on the floor.
Planning a handmade tile installation? Talk to Fox Marble's tile team before the tile ships. Layout and joint decisions are cheapest while the tile is still in the box.
Fox Marble is part of Fireclay Tile, a handmade tile manufacturer. The guidance above follows NTCA installation standards and applies to handmade tile from any source.
Frequently asked questions
How wide should grout joints be for handmade tile?
A minimum of 1/8 inch to 3/16 inch, and sometimes up to 1/4 inch. A 1/16 inch joint is too tight because the edges are irregular and sizes vary between tiles. The wider joint absorbs the inconsistency so the grid still reads straight.
How much size variation is normal in handmade tile?
Up to 1/8 inch, and sometimes 1/4 inch, of variation in length, width, and thickness within a single batch. That is normal for the material rather than a defect.
Do handmade tiles need to be blended before installation?
Yes, and it's mandatory. Four to five cartons get opened at once and tiles are pulled randomly from each to build the working pile, so color variation and glaze pooling distribute evenly instead of appearing as blocks of light or dark tile.
Does handmade tile need to be back-buttered?
Yes, every piece. The backs are concave, so thinset is applied to the back of each tile before it's pressed into the combed thinset on the wall, targeting 95 percent or greater coverage. Skipping it leaves voids behind the tile.
How much extra handmade tile should I order?
Around 25 percent over the measured quantity. That covers cutting and breakage and leaves enough on hand to set aside individual tiles with characteristics you do not want on the finished wall.
Should I approve a dry lay or a mockup?
For handmade tile, a grouted mockup. A dry lay shows the tile but not the joints, and on handmade tile the varying joint widths are a large part of the finished look. Everyone with approval authority should sign off on it, including the homeowner, not only the designer.